
Clipping paths are a very helpful method that enables you to generate composite photos of objects, change the background color, or separate products from their surroundings. If you are able to learn how to create a clipping path in Photoshop, you will be able to make simple and secure edits to your photographs without risking damage to the original file.
What is a clipping path?
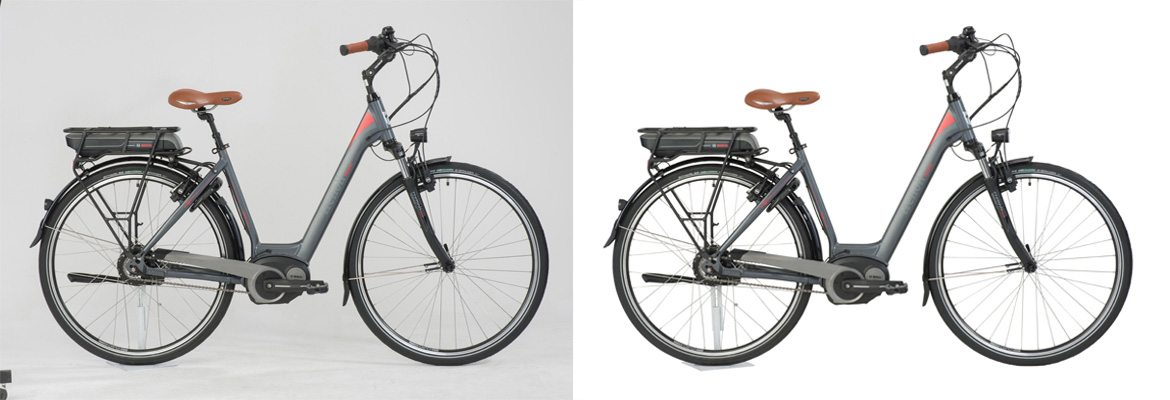
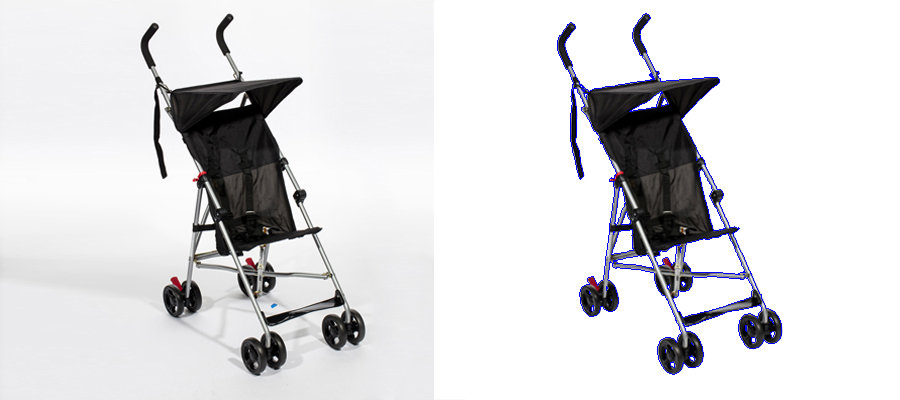
It is possible to remove an object or product from its background using Photoshop's clipping path, which is a powerful feature that allows you to do so. This is something that always cannot be accomplished using other methods. When you have a product that is shown on a sophisticated or multicolored background, you will find that this strategy is quite helpful.
Why do we need clipping?
The process of clipping is an important one that helps us differentiate the foreground of an image from the items that are in it. We are able to get greater versatility within a single shot by cutting the product photos off of their backgrounds. Because of this technique, we may utilize the same photograph but give it a variety of backdrops or present our goods in a number of different colors without having to take new photographs.
When to use a clipping path?
There is a variety of contexts in which clipping routes can be beneficial. For instance, you could find them helpful if you wish to display a product against a background that is white or otherwise unadorned or against a background that is transparent. Clipping paths are also helpful when you want to incorporate your product into a composite photo with several other products. Clipping paths are also helpful when you need to modify the color of your product or a part of it. This is especially beneficial if you have the same product in multiple colors. Clipping paths are also helpful when you want to incorporate your product into a composite photo with several other products. Clipping paths, in their most basic form, are useful whenever you need to separate your product from the other features that are present in a shot.
How to create a clipping path in Photoshop?
Here are some steps to follow for creating a clipping path in Photoshop by using the Pen tool:
Set up the Pen tool.
Use the Pen tool to draw a path around your product.
Save the path, you have created.
Create a clipping path.
Create a selection from your clipping path.
Finally, create a clipping mask.
Step 1: Set up the pen tool
The Pen tool is necessary for creating a clipping path in Photoshop, and if you're familiar with the Pen tool in Adobe Illustrator, you'll have no trouble picking up the Photoshop equivalent. If you want to make a clipping path instead of a shape, you need to make sure the tool is set up properly first.
You can use the keyboard shortcut "p" or the Pen Tool icon on the Toolbar to access the Pen Tool in Photoshop. It is possible that the Pen Tool is hiding under other tools in the Toolbar, such the Freeform Pen Tool, the Curvature Pen Tool, the Add Anchor Point Tool, the Delete Vector Point Tool, or the Convert Point Tool, if you did not locate it.
In the Options Bar located at the top of the Photoshop application window, you can find settings for the Pen Tool. To ensure that you create a clipping path and not a shape, select "Path" and then choose "Combine Shapes."
Step 2: Use the Pen tool to draw a path around your product.
Making a trail around your shape should be simple if you have used the Pen Tool before. However, if you are unfamiliar with the Pen Tool, we'll provide the basics to start using this useful tool.
You should "clip" an image by using the Pen Tool by clicking your mouse once on the edge of the image.
Hold down the left mouse button while you click the mouse again to set the next point in order to build a path that is curved. While maintaining pressure on the left mouse button, slide the pointer around the edge of the thing you're working on to create the curved form you want. You can let go of the button on the mouse when you feel that the shape of the curve is to your satisfaction.
Repeat the previous step all the way along the edge of your object until you have constructed a route that goes completely around it. To complete the path, slide the Pen Tool over the beginning point until a circle appears next to the Pen Tool. This will indicate that the path is complete. This suggests that you are about to block off access to the route. To finish the path, you need to click on the location where you first started.
Using the Direct Selection Tool enables you to adjust or fine-tune the path by modifying any of the points that you have added. If this is something that interests you, read on. You'll find this tool just below the Path Selection Tool in the toolbox.
Step 3: Save the path, you have created
If you're happy with the path you've generated, head to Photoshop's Paths panel. If the panel isn't already showing, you can bring it up by going to Windows > Paths. If it isn't already selected, select the newly created Work Path once you reach the panel. Then, select Save Path from the panel's drop-down option.
My advice is to give the new path you're creating a name that describes the thing it will be used to outline. This is helpful if you're working on a file with many clipping paths.
Step 4: Create a clipping path
Most of the time, a real clipping path is a path made in Photoshop that other programmers can recognize. For example, you can use Photoshop to make a clipping path around an image of a product without changing the original image. Later, you can bring that image into design software like InDesign or Illustrator, and the background will be taken away automatically.
This step will show you how to make a "traditional" clipping path. In the next step, you'll learn how to directly erase the background in Photoshop by using the path you just made.
Go to your Paths panel and click on the saved path you made to make a traditional clipping path. Then, click the panel menu again and choose Clipping Path.
You won't be able to see that anything has changed in your Photoshop document, but if you save your image as a PSD file and then insert it into InDesign or Illustrator, you'll see that the clipping path is now active and carrying out the task for which it was designed.
Step 5: Create a selection from your clipping path
If you're using images for e-commerce, you'll probably need to completely remove the background from a picture of a product in Photoshop. Since you've already chosen your path, the next step is easy. First, make sure that you are in a layer that you can change. Go to the Panel for Layers. If you don't see the panel, choose Window > Layers from the dropdown menu at the top of the application window.
Check to see if the layer that has your product image is unlocked. If your image is on a locked Background layer, double-click on the layer to make it Layer 0. Select OK.
Check to see that the newly formed path you just made is highlighted in the Paths panel. After that, choose Make Selection from the menu that appears on the panel. After you have made sure that the Feather Radius is set to 0, click the OK button.
The next step is to navigate to the application window's top and select> Modify > Contract from the menu. The following dialogue box will appear; in it, reduce the contract radius to 1, then click OK. Doing so will move your selection slightly inward, and any background artifacts that might have shown in your masked image will no longer be visible.
Step 6: Create a clipping mask
Go back to the Layers panel to move on to the next step. Choose the layer that has the image of your product. The Add Layer Mask icon looks like a black rectangle with a circle cut out of the middle. It can be found at the bottom of the Layers panel. Click this icon.
You have finished creating a layer mask that successfully differentiates your product image from the background it was taken against. This method does not cause any damage to the original backdrop, so you will still have access to it in the event that you require it at a later date.
You now have the option to position your product image in a different environment by adding a new backdrop layer below your Layer 0 or leaving it with a transparent background.
Saving your clipping path in Photoshop
When working with Photoshop, saving your clipping path is an important step in addition to learning how to create a clipping path in Photoshop. If you do not save it, Photoshop will replace it with a new Work Path whenever you create a new route, even if you have already saved it.
It is possible that you have previously saved your clipping path before moving on to step 3. Nonetheless, it is imperative that you do so if you haven't already saved it. To save your clipping path, go to the Paths Panel, choose the Work Path in the panel's drop-down menu, and then choose "Save Path" from the menu that appears. When working with paths, it is strongly advised that you save your path at regular intervals.
You can have multiple clipping paths in a single document, as long as you save each one individually after you're done with it.
Conclusion
While clipping paths are incredibly useful in photo editing, they might be difficult to make at first. Because of this, some designers and photo editors choose to outsource the clipping path process to experts who have a trained eye and plenty of experience cutting paths in product images.
To summarize, knowing how to create a clipping path in Photoshop is essential for any graphic designer or photographer. When working with product photographs, it provides you with additional versatility and the ability to separate things from the backdrops in which they are located. You may make a clipping path in Photoshop and store it for later use if you follow the guidance that is located above the step-by-step instructions. With this ability, you will be able to make great photos of your products, which will help set your company apart from the competition. Hence, if you want to take your ideas to the next level, you need to start constructing clipping paths in Photoshop.
Post a Comment