Have you ever observed that most eCommerce websites display product images on a white background? Do you know the rationale behind this trend?
Product photos are the primary element that can either attract or repel potential customers. Hence, to captivate customers, it is crucial to use professional-looking photos with no distractions, such as a white background, which can emphasize the product's features.
Products displayed on a white background appear clean and elegant, with the product's characteristics standing out prominently. This approach also aids in maintaining consistent branding and instilling trust in the product.
Why Do You Need White Background Product Photography?
For a variety of reasons, product photography often features photographs of products set against white backdrops. To begin, they provide consistency and ensure that things seem beautiful despite the fact that their color or design may vary. White backgrounds are excellent for minimizing distractions and maintaining attention on the product, which is another benefit of using white backgrounds.
They also provide adaptability for marketing platforms such as Google Shopping and Amazon, both of which demand that product photographs have a white backdrop. Because white backgrounds are also simpler to edit, they are an excellent choice for novices who are just starting out in product photography and editing.
White backgrounds may seem to be dull; nonetheless, they provide an excellent base upon which to build when coloring or adding other effects to photographs of products. In general, utilizing a white backdrop when photographing products may assist generate photographs that have a more professional appearance and can be utilized across a variety of platforms and marketing channels.
Different Types of White Background Photography
The following is a list of some suggestions for the best white backdrops for product photography, along with the merits and downsides of each option:
Wall of White
A method that is widely used and inexpensive may be used to produce a white backdrop. However, the outcome might be different depending on the texture of the wall.
Foam Board
At a reasonable price and readily accessible at local and online stationery stores. Tabletop photography of tiny goods may be done using this setup. It's possible that the size of the table and the merchandise will call for many boards to be used.
V Flats
The best illumination was achieved by arranging large foam boards in a V formation. The majority of the time, studio photography requires the employment of experienced photographers.
White Paper Without Blemishes
A solution that is not only practical and inexpensive but also produces results that seem like they were done by an expert. The surface is matte and does not reflect light, but it is essential that it be stored correctly to avoid being harmed by condensation.
A Curtain of White
An option that is both cost-effective and versatile, since it may be draped in front of light sources to make the background brighter. The fact that the fabric is so prone to wrinkling and staining makes it challenging to care for.
Cyclorama Wall
A continuous white wall offers the best opportunity for producing high-quality photographs of products. The construction costs might be high, but this kind of lighting is ideal for studio environments. Those who do not have the financial means to construct their own studio may choose to consider renting one instead.
White Background Product Photography
Obtaining the ideal level of whiteness for use in product photography is a typical source of difficulty, especially for online retail platforms such as Amazon.com. Consider the following factors if you want to get the outcome you want:
Think About the Actual Thing Itself
When photographing goods, the major focus should be on obtaining a depiction of the object that is as accurate as is feasible in the given circumstances. This entails establishing the ideal settings and camera angles at which the product may be displayed in order to make it appear its very best. In addition to this, it is quite important to consider whether or not a white background will make the product seem better.
Make the Background Out of a Piece of White Paper
A white background is perfect for shots in which you want to reduce the number of elements that might potentially detract from the subject of the photo. In addition to this, it enhances the appearance of the various colors in the frame without drawing attention away from the topic of the photograph. When it comes to photography, one of the most attractive aspects of using white paper as a background is that it enables the photographer to take high-quality photographs with any camera.
Taking Photographs with a Camera and Several Lenses
When photographing a product against a white background, it is essential to adjust the camera settings so that they are in line with the lighting circumstances. Only then can the finer details of the object be captured. Because of this, it is strongly suggested that standard lenses be used in conjunction with cameras that have processors and sensors of a high grade.
When shooting a product against a white background, the optimal settings for a camera are an aperture of f/22, an ISO of 100, and a shutter speed of 1/250. These settings should be used in the majority of instances. These settings, however, may be altered in order to cater to a wide range of different lighting configurations.
Adjusting the White Balance in the Settings of the Camera
When photographing products against a white background, correcting the white balance is very required to prevent color casts of any kind from appearing on the items being shot. These color casts might be blue, orange, or any other color.
Despite the fact that digital cameras are able to detect white balance in the great majority of different scenarios, the findings are not guaranteed to be correct all of the time because of how the scene is lit. In order to achieve a better degree of accuracy, the usage of grey cards is sometimes allowed.
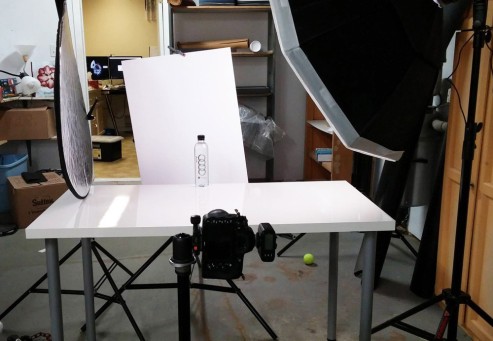
How to Get a White Background with Lighting and Positioning
When taking images against a white backdrop, the key to getting beautiful shots is to position your lights in the right places and make strategic use of the shadows. If you know how to properly arrange your items and lights, you may make advantage of both natural and artificial lighting sources.
Since the color of the light varies during the course of the day, working with natural light may be rather difficult. As a result, more effort is necessary to locate the appropriate level of neutral light. The depth of the shadows and the intensity of the sunlight may both be manipulated via the use of diffusers and reflectors.
Since their strength and temperature may be adjusted in accordance with the circumstances, working with artificial lights is much simpler than working with natural light. It is generally agreed that the best lighting for photographing products is achieved with a three-light arrangement, with two lamps positioned on both sides and the third situated on top with its back to the object.
Modifiers Are Used to Control the Light
Modifiers of light such as diffusers, reflectors, and flags may be used to exert control over the light. A scrim may be used to disperse natural light, while softboxes and umbrellas can be utilized for artificial lighting due to the sheer fabric that uniformly distributes the light that they are constructed of.
On the other hand, light is able to escape through the sides of the umbrellas, which may result in a reduction in the light's intensity. Due to the enclosed sides, softboxes are the superior choice when it comes to the modification of light.
Since light is reflected back from a white surface, any solid substance that is white may also be utilized as a reflector. On the other hand, a piece of dark fabric, such as a curtain, is referred to as a flag, and it may be positioned in front of your light source so that it can take in light from other sources.
Off-Camera Flash May Be Used to Illuminate Your Background
An effect known as a white backdrop may be achieved by using an off-camera flash and overexposing the background. In order to do this, the subject need to be set at a considerable distance from the backdrop, and the off-camera flash ought to be positioned behind the subject, with its front side towards the background.
During the photo session, you should switch on the flash that is integrated into the camera. This will cause the off-camera flash to fire, which will make the backdrop seem white.
Take Care Not to Overexpose the Background
An effect known as "overexposure" may be brought about by an excessive amount of reflection from white backgrounds. To prevent this from happening, the lighting of the backdrop should be changed until it seems to be ideal for the subject being photographed. The picture quality will suffer since overexposed light may blur the details of the items being photographed.
How to Edit White Background Product Photography?
When it comes to photo editing, it's important to ensure that your images are bright, with good exposure and true-to-life colors, free from any unnecessary spots or dust, well-framed, and correctly sized for the platform you plan to post them on. To achieve this, follow these steps:
Step #1: Remove the Backdrop Edges
The first thing you need to do is get rid of the background in your picture. This includes cropping your product picture in such a way that any boundaries that reveal the end of your backdrop are removed. This will leave you with the product alone against a white background.
Step #2: Adjust the Background Brightness
After the backdrop has been removed, it is time to adjust the brightness of the background. This entails brightening up the backdrop so that it is white and bright rather than boring and grey.
Step #3: Retouch the Spots
The background and the product both need to have any stains or dust that is visible on them cleaned up before going on to the next stage. To do this, any fibers or dust that may be present need to be removed.
Step #4: Make Color Adjustments
Adjust the image's brightness, exposure, and saturation to get the colors to pop and seem as close as possible to how they appear in real life.
Step #5: Optional: Consider Adding a Shadow
You have the option of adding a shadow to your product in order to provide it with more depth and dimension.
Step #6: Removing or Editing the Background Color
After you have perfected the editing of your product picture, you may want to try adjusting the color of the backdrop so that it complements your marketing banners or landing pages. When switching to colored backdrops, it will be simpler if you first shoot against a white background and then have your photographs edited by a professional.
Step #7: Saving and Resizing Images
Make sure that you capture and edit your photographs in the finest possible quality, and then resize them to the appropriate proportions for the platform on which you want to share them. Save your photographs using the appropriate dimensions and aspect ratios for each platform, since each one has its own set of recommendations to follow.
Step #8: Optimizing Your Photos for SEO
Finally, be sure to optimize your photos for search engine optimization by giving them appropriate names and compressing the final images. This will prevent the loading of your website from being slowed down. Check out the two tutorials that are referenced in the article if you want additional information on how to optimize your online shop using do-it-yourself search engine optimization.
Conclusion
If increasing the number of sales of your items is one of your primary objectives with the use of photography, you have to give some thought to making use of a white backdrop for the future photoshoot of your products. We hope that this post has given you helpful information and thoughts on how to make effective use of the white backdrop while photographing products. Enjoy taking stunning pictures of your products as you continue to put this information to use.
Post a Comment